2022-04-03 06:46:05
もう四月である。もっと頻繁に更新しようと思っていたのに。
この3ヶ月間での朝顔に関する大きな出来事は、水耕栽培である。水耕栽培装置を使って室内で年中朝顔を育て、花を咲かせ、種を採りたいと思ったのである。
朝顔を育てるのに必要なのは、栄養と温度である。花を咲かせるのに必要なのは日照時間の調節である。室内に植木鉢を置けば温度は人間が生活する室温に置くことはできる。が、植木鉢は邪魔だ。マンション住まいで厄介なのが植木の土である。そこで水耕栽培ならどうだろうと考えた。早速註文して届いたのがこの装置である。
iDOO 水耕栽培キットをamazon.co.jpに1月3日に註文した。そして翌日に届いた。スポンジに、桔梗咲き朝顔とマルバアサガオの種を埋込んで数日待つと芽が出てきた。一緒に、青梗菜や紫蘇、イタリアンパセリなども蒔いた。後でこれは後悔した。

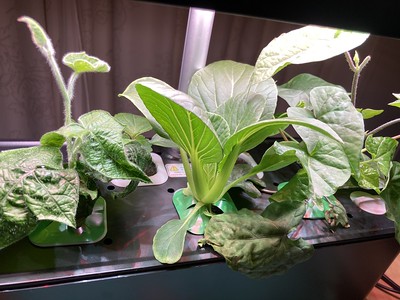
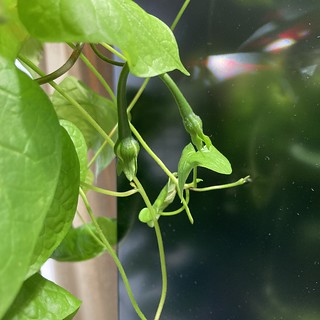
朝顔は順調に育っていった。この頃、照明は16時間のONと8時間のOFFである。下は1月16日の写真。


どんどん育つが青梗菜が邪魔になってくる。
あまりにも邪魔になったので青梗菜は食べてしまった。すっきりしたが、今度はイタリアンパセリや紫蘇が邪魔になってくる。

なかなか花芽が付かないので、短日処理を行なう。照明を12時間照射、12時間の消灯にした。消灯しても部屋の明かりは点いている。書斎だから暗闇にはできない。そこで、仕事から帰ると黒い布を被せることにした。さらに、葉を1枚、アルミ箔で覆う処置を施した(2晩)。黒い布は二週間くらい続けただろうか。その頃になって蕾が見えてきたので、布を被せるのはやめた(面倒臭いのだ)。
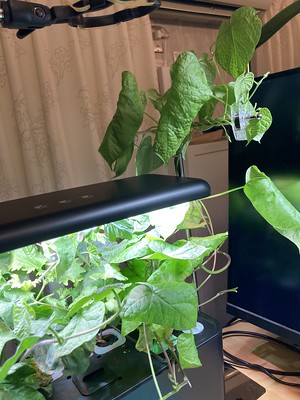
最初のマルバアサガオの花が咲いたのが3月2日。種を蒔いてから56日だろうか。そんなに遅くないかも知れない。桔梗咲きは3月13日に最初の花が咲いた。種を蒔いてから67日目。こんなものだろうか。

写真は最初に咲いた日のものではない。

そして今は種ができるのを待っているが、もうしばらくかかりそうである。

ということで、まあ何とか、真冬でも朝顔を育てて咲かせて種を採るのは可能なようだ。水耕栽培でもできる。水耕栽培装置のいいところは照明にタイマーがついていることである。
水耕栽培については自作の装置でミニトマトを育てたりした話もあるのだが、ここに書く元気があるかどうかは判らない。
2021-12-31 06:48:11
大晦日になってしまった。この日記を復活させて、本の感想でも書けるかなと思ったがやはり書けなかった。新たな使い道を考えることにする。
過去に遡ってみるといろいろなネットワーク関係の設定を書き残していたり、RやPythonの覚書に使っていたり、あるいはパンを焼く記録をつけていたり、梵寿綱建築の写真を掲げていたり、一貫性がないことがよく判る。
今後はどうするかというと朝顔の記録である。今いちばん関心があることが朝顔だからだ。来年からは朝顔日記である。ただ、朝顔が生きているのは4月くらいから11月くらいまでだ。12〜3月はほぼ書くことがない。ということで、今日は昨年から試みている琉球朝顔と曜白朝顔の交配のことを書くことにする。
朝顔はIpomoea nilという生物種である。マルバアサガオはIpomoea purpureaで、琉球朝顔はIpomoea indicaだ。朝顔とマルバアサガオを交配するのは困難である。今まではアフリカ系の原種を使って交配させることで何とかマルバアサガオと朝顔の交配ができることが判っていて、普通の朝顔の園芸品種とマルバアサガオを交配させようとしても無理だと報告されている。そういう工夫を形有してマルバアサガオの遺伝子を導入した品種の一つが曜白朝顔である。
さて、朝顔と琉球朝顔はどうかというと、これも無理だと報告されている。しかし、無理を承知でやってみた。曜白朝顔はマルバアサガオの遺伝子が数パーセント混じっているのだ。普通の朝顔と違う挙動を示してもおかしくない。琉球朝顔は自家受粉で種ができないから、交配のために前の晩に雄蘂を除去したりしなくていい。ただ、他の朝顔の雄蘂の花粉をつけてやればいいだけだ。そこで、サカタのタネで売っている「富士の紅」の花粉を琉球朝顔「オーシャンブルー」の雌蘂につけてみたわけである。それを2019年に何度か繰り返した。その頃はまさか種ができるとは思っていないので、そんなに数多くは試みなかったのだが、もう冬になるという頃に種が一粒できているのに気づいて採種。しかし、そのときはまだ交配できたとは信じていなかった。何かのはずみで琉球朝顔の種ができたのだろうと思っていた。
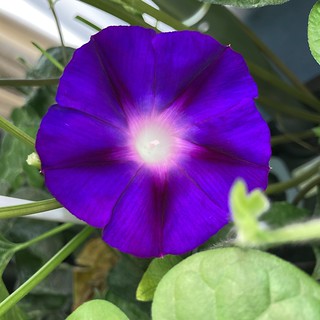
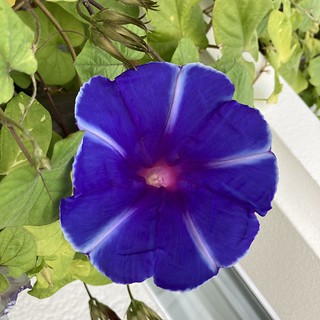
我が家の琉球朝顔の花はこんな感じ。ごく普通の品種である。

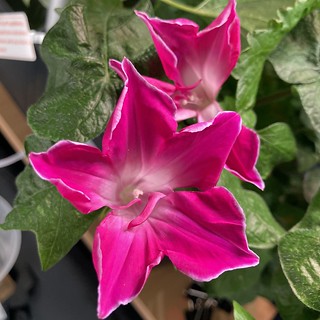
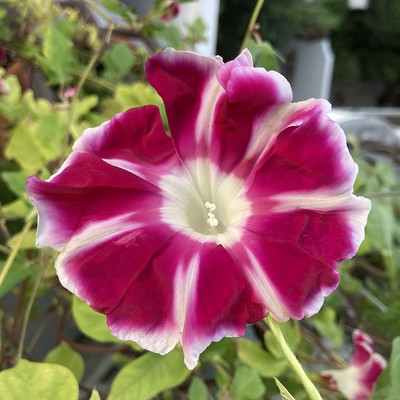
一方、富士の紅はこんな花。サカタのタネから簡単に買える。
その種を蒔いたら芽が出てきた。普通種を蒔くと芽が出てくるのではあるが。普通の朝顔の芽だった。が、日光に当てるとすぐにぐったりしてしまうなど、ちょっと変な感じはした。写真はない。
その後は元気になり、ぐんぐん生長した。葉は琉球朝顔のような形だが厚みはない。これはひょっとして交配種なのかと期待して育てる。さらにぐんぐん生長する。しかし、花は咲かない。葉と葉の間隔が無駄に長い。秋になってようやく咲いた。曜のところに白い線が入っている。長さも妙に長い。こんな琉球朝顔はない。


次々に花が咲き、曜の白もくっきりしてきた。曜以外の部分も白っぽくなる花も。

ときどき六曜の花も咲いた。これも琉球朝顔にはない性質。

さて、さらに季節が進み寒くなってくると曜の白い部分がなくなってきた。そして、大晦日になってもいくつか咲いている。葉はもうほとんどなくなってしまったのに。おそらく越冬するだろう。これは琉球朝顔の性質である。富士の紅ではありえない。
この交配種の種が採れれば面白いのだが、残念ながら雄蘂に花粉ができない。しかも雄蘂が花弁と融合していて先端だけ花弁から飛び出しているような姿になっているものもある。では、これの雌蘂に富士の紅や琉球朝顔の花粉をつけたら? と思っていくつも試したが種はできなかった。残念。


去年は一粒しか種が採れなかったが、いちど採れると判ればもっと試そうという気になるものである。そうすると、次々に種がつき十数個の種が採れたのである。来年全部蒔くのは難しいが、一つ二つ様子を見てみよう。

さらに、富士の紅の雌蘂に琉球朝顔の花粉をつけるというのも試してみた。こちらは前の晩に富士の紅の雄蘂を除去しておかなければならないのでそんなにたくさん試みることはできなかった。少し膨らみかけるが種はできない。諦めていたところ、一つだけ種ができた。来年蒔いてみよう。ただ、これに関しては私はまったく信用していない。まあ、蒔いてみれば判る。
あまりにも容易に富士の紅と琉球朝顔の交配で種が採れるので、ひょっとしてこの琉球朝顔は特殊体質で、簡単に異種交配できる個体なんじゃないだろうかと疑い、日本の朝顔(青雲やスノーフレーク)、マルバアサガオ(ミルキーウェイ)の花粉をつけてみたが一つも種はできなかった。では、相手は曜白なら何でもいいのか……ということは来年検証したいと思っている。茶色の曜白と交配したら何色になるのかとかも含めて。
百年ぶりにfrickrを使ったからいろいろ大変だった。自分のアカウントとパスワードを見つけるところから。
来年は朝顔の話題を頻繁に書くようにするつもりです。
2021-03-12 23:51:53

『クオリティランド』(森内薫訳/河出書房新社/2019)で日本に紹介されているマルク=ウヴェ・クリングのDie Känguru-Chronikenを読んでみた。隣に引越してきたカンガルーに振り回される主人公の毎日が軽妙で笑いに溢れた文章で綴られる。言葉を話すカンガルーが出てくるが、お伽話ふうのほのぼのとした話ではなく、カンガルーは共産主義者で、語り手と探偵事務所を設立したり、精神科医を狂わせたり、騒動を起こしたりすることもあれば何となくぼんやりした話で終わることもある。すべて現在形で記されていて、その書き方自体もカンガルーに莫迦にされたりすることもあり、そうすると「過去形だって使える」とか「現在完了だって!」とか、次々に時制を見せていってくれるところなどは日本語に訳すとなると難しいだろうなと思う。
現在までに4巻が刊行されているようである。第一巻が面白かったので、第二巻を読もうとしたら難しくて読めなかった。どうして第一巻が読めたのかはよく判らない。
うまくその雰囲気を出せているかどうか判らないが冒頭部分はこんな感じ。
〈向かいのカンガルー〉
ピンポーン、呼び鈴が鳴る。僕がドアまで行って、開けると、カンガルーが目の前に立っている。瞬きをして下を見ると階下へ下りる階段が見える。それから、上へ昇る階段を。正面を見る。カンガルーはまだそこにいる。
「こんにちは」カンガルーがいう。
首を動かさずに、もう一度、左を見て、右を見る。時計を見る。結局、カンガルーを見る。
「こんにちは」ぼくはいう。
「向かいに引越してきたばかりなんだけど、パンケーキを焼こうと思ったら、卵を買うのを忘れていることに気がついて……」
ぼくは頷いてキッチンへ行って、卵を二つ持って戻って来る。
「どうもありがとう」カンガルーはそういって、卵を袋の中に放り込む。
ぼくが頷くと、カンガルーは向かいの部屋のドアの向こうに消える。ぼくは左手の人差し指で鼻の頭を何度か擦る――そして、ドアを閉めた。
すぐにまだ呼び鈴が鳴る。瞬時にドアを開ける。ぼくはまだドアの前に立っていたからだ。
「あっ!」カンガルーが驚いたようにいう。「ずいぶん、速く鳴るんだ。ええと……たった今、気がついたのだけど、塩も持っていなくて……」
ぼくは頷いてキッチンへ行って、塩入れを持って戻って来る。
「どうもありがとう! もしかして、牛乳と小麦粉も少し……」
ぼくは頷いてキッチンへ行く。カンガルーは受け取って、礼をいって去る。二分後にまた呼び鈴が鳴る。ぼくはドアを開け、カンガルーにフライパンを調理油を差し出す。
「ありがとう」カンガルーがいう。「冴えているね。もしかして、泡立て器か攪拌器を持っていたら……」
ぼくは頷いて、キッチンへ。
「それから、もしかしてかき混ぜるのに使えるボールもあったら」カンガルーが後ろからぼくに呼びかける。
十分後、また呼び鈴が鳴る。
「レンジが使えなくて……」カンガルーがいう。
ぼくは頷いて、中へ入れてやる。
「そこのすぐ右だから」ぼくはいう。
カンガルーはキッチンに入って、ぼくはその後ろに続く。でも、あまりにも不器用なので、ぼくが代わる。
「中に入れるものがなにかあったら……野菜とか挽肉とか?」カンガルーがいう。
「挽肉だったら、まず買い物に行かないと」ぼくがいう。
「大丈夫。時間はあるから。生地も少し休ませてやった方がいいし」とカンガルー。
ぼくは鍵掛けから鍵を取る。
「でも、リドル[ドイツのディスカウントスーパーマーケット]はやめておいて」カンガルーの声が後ろから聞こえる。「あそこは労働条件が悪くて……」
ぼくは肉屋へ行って、挽肉を買う。部屋に戻るとき、隣に住む女の人に会ってしまう。
「新しく来た人に会った?」と訊かれる。
ぼくは頷く。
「この辺の出身じゃないでしょう?」といって、小さなヒトラー髭をひっかく。もちろん、彼女にほんものの髭が生えているわけではない。産毛というべきものだ。ヒトラー産毛だ。
「すぐに、トルコからひと家族まるまる押しかけて来るんじゃない?」
ぼくはもう一度よくよく彼女を眺めてみる。うーん、やはり髭じゃないだろうか。
「何見てんの?」彼女が訊く。
「たぶん、オーストラリアから来たんだと思いますよ」ぼくはいう。
「ふうん、オーストラリア? そうかも。でも、どこから来たかはどうでもいいでしょうよ。どっちにしても、こういうイスラム教徒にはいらいらすんのよ」
2021-03-12 04:08:51

未来は変わるという本。前にも劇的に変化する未来について語る本があったが、どうしても思い出せない。比較しようと思ったのだが。その本でも、変化は加速し、寿命も克服できると書かれていた。何とかそれまで生きなさいと。私もそれまで生きなければと思ったのだが、本書でもやはり老化は克服できると書かれている。本当に克服できるのだろうか。
もう少し落ち着いて中身を見てみると、まず変化の速度が速くなっていると著者らは警告する。今までは想像もできないような速さになるという。変化同士が相互作用をしてもっと速くなるというのだ。コンピュータの速度はどんどん速くなってきたが、従来の方法では限界がある。それを打破するのが量子コンピュータであり、桁外れの演算速度が実現し、それに基づく人工知能も発展するという。世界を覆い尽くすネットワークの許で、ものの売り方(広告)が変わり、金融が変わり、教育が変わる。高度なバイオテクノロジーによって医療が変わり、老化すら克服できるという(もちろん、不老不死になるといっているわけではない)人類は、都市に集まるようになり、地球からも脱出できるし、さらにはネットワークへ接続することによって、クラウドベースの集団意識へと移行するとか(ちょっとそれはどうかと思うが)。
著者らは、この変化は人類をよりよくしていくと考えている。人類の未来を暗く予測する本もあるが、こういう意識は読んでいて気持ちのよいものである。その世界で私たちが目指すべきものは、贅沢な暮らしではなく可能性に満ちた世界だという。その中で個人が可能性を持ち続けるためには、常に学び続けることだとも。
大変革が続く未来を思い描く姿勢は何かに似ているなと思った。つい最近見かけた……何だっただろうかと思い巡らし、どうやら私の頭にあったのは、ARK Investment Management の未来予想だったようだ。さまざまな技術革新が組み合わさって大変革がもたらされる。そのための投資をしようという会社である(投資会社だから)。共通した未来に対する楽観があるように感じる。そして、その未来に対する楽観が私は決して嫌いではない。
2021-03-03 23:49:31
以前から毎日本を買ったら記録をしていて(この頃は毎週だけど)、ここの別の日記の方に買った本を列挙するとき行頭に●とか○とかを付けるようにして、その他の理由では決してこれらの丸を使わないようにしている。日記本文はMySQLに収納されているので、月ごと年ごとに丸の数を集計すれば買った本の冊数が判るというわけである。
それを数え上げ、gnuplotでグラフにしていた。Ubuntuではgnuplotをatp-get install... とやれば簡単にインストールできたのだが、Amazon Linux 2ではそれができない。そこで、JpGraphを使ってみることにした。
ダウンロードページから最新版をダウンロードしてきて、適当なところに展開する。基本的にはこれだけでいい。今回は日本語を使いたかったので、jpg-config.inc.phpの中にある日本語フォントを指定する行を:
define('MBTTF_DIR','/xxx/xxx/jpgraph/fonts/ja/');
と書き換えた。/usr/share/fonts みたいなところでもいいのだけど、ipag.ttf と ipam.ttf が別のディレクトリにあるのをどうしたらいいか判らなくて、jpgraph内のfontsに両ファイルをコピーした。フォントはyum install ipa-gothic-fonts ipa-pgothic-fontsとやっただけ。
グラフを描かせるphpファイルの方には、冒頭で:
set_include_path("/xxx/xxx/jpgraph");
require_once("jpgraph.php");
require_once("jpgraph_line.php");
としておく。今回は折れ線グラフなのでjpgraph_line.phpを使う。
MySQLデータから和書と洋書の数(●と○の数)を月ごとに集計するのは省略して、それぞれの集計値を$out_wa、$out_you、合わせた数を$out_ttlとしている。そこで:
$graph = new Graph(600,400);
$graph ->setScale('textlin');
$graph->SetMargin(40,20,10,80);
$graph ->legend->setFont(FF_GOTHIC, FS_NORMAL, 10);
$graph->xaxis->SetTickLabels($xarray);
として、グラフの大きさ、マージンの大きさ(これを調整しないと凡例がX軸ラベルと重なったりしてしまう)、フォントの種類などを指定する。
$line_wa = new LinePlot($out_wa);
$graph -> Add($line_wa);
$line_wa -> SetLegend('和書');
$line_yo = new LinePlot($out_you);
$graph -> Add($line_yo);
$line_yo -> SetLegend('洋書');
$line_el = new LinePlot($out_elc);
$graph -> Add($line_el);
$line_tl = new LinePlot($out_ttl);
$graph -> Add($line_tl);
$line_tl -> SetLegend('和書+洋書');
のようにして線を3本設定して、
$graph->Stroke();で描かせる。
するとこんなふうになる。
こういう内容のグラフなら、積み重ね棒グラフの方が相応しいと思うが、まあいいのだ。
2021-02-27 02:34:03
PHPが7になって、MySQLとの連携が変わったとき、本の話を書く方の日記は自分で作ったページなのでその変更を反映させたが、ここはP_BLOGというWeblogシステムを使っていたので、どうやって変更すればいいのか判らず放置していた。さらに先週、Amazon EC2のインスタンスをUbuntuからAmazon Linux 2 へと変更して新規作成し引越しをしたら、この記事情報を保存していたMySQLデータが壊れたらしく、MySQLに保持できなくなってしまった。もうなかったことにしようかなと思ったのだが、自宅の古いMacMiniにあったMuSQLデータを引っ張り出してきて、入れてみた。もっとあったと思うのだが、400件以上戻ったのでちょっと嬉しい。
P_BLOGはもう15年くらい前に更新が終わってしまっているので、もう一つの自作日記システムでデータを読み出すようにして、何とか復活。復活したものの、ここに何かを書く余裕はまったくないかも知れないと思いながらも、何となく復活できたことが嬉しいので、何かに活用しようかという気分になっている。
2013-07-19 00:34:16
以前、職場から自宅のAirMac Extremeに繋いだディスクに接続できなかったのだが、いつの間にか繋がるようになっていた。その設定等を控えておく。
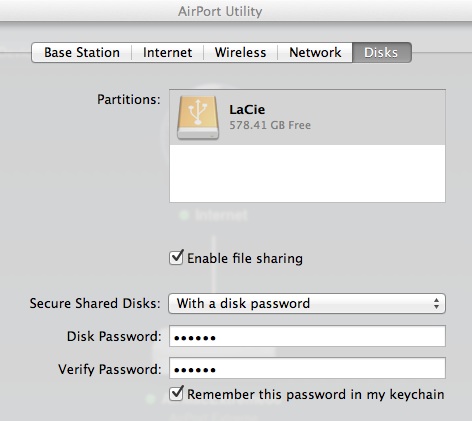
AirMacユーティリティ(英語版だとAirPort Utility)でディスクを接続しているAirMacを開いて、Disksのパネルでファイル共有をオンにする。ここでは、LaCieの外付けハードディスクをUSB接続しているので、LaCieと名付けている。
どこでもMyMac(英語だとBack to My Mac)は使わない(設定しない)。
これだけでいいはず。
繋ぐときは、Finderでサーバへ接続を選んで、サーバの登録をする。ServerAddressにafp://xxx.xxx.xxx.xxx/LaCieと入力して、Connectボタンを押すだけ。iPadから繋ぐときは、afpに対応しているアプリ、例えばGoodReaderを使えば簡単にできる。
Ubuntuから繋ぐこともできる。まず、afpfs-ng, afpfs-ng-utils, libafpclient0をインストール。ホームディレクトリに、MyMacというディレクトリを作成。そして以下のようにマウントすればいい。
$ mount_afp afp://username:password@xxx.xxx.xxx.xxx/LaCie ~/MyMac
Mounting xxx.xxx.xxx.xxx from LaCie on /home/xxxxx/MyMac
Mounting of volume LaCie of server AirMac00 succeeded.
といった具合で、接続完了。意外に簡単である。
いや、これは便利である。EC2のWebDAV要らなかったじゃないかといいいたくなるほどである。